The Quilt University course is now nearing the end of week two and after a struggle, I have produced a design for my quilt that I'm reasonable happy with. The next step is to do some colour studies to see which shapes need to come forward, and which need to recede!
Dena Crain, the tutor is very encouraging with just the right way of criticising without getting personal. There is a lot to read and the next lesson will be up tomorrow so there's still lots to do.
So here is the design, as yet not totally finished as it doesn't have a border. It will need trimming because now that it is full size (A0), it does have a lot of empty space at the edges.
It's a pretty awful photo, but I hope it gives a flavour!
So my DH and I have been discovering the delights of getting an image scaled up and then printed out and it's taken us most of the day! He is such a treasure, because the only way we found it could be done was to select areas from the original in Paint Shop Pro and then print each one and then stick them back together with magic tape! He stuck at it and now I have my design pinned up on the design wall waiting for the next step.
Tomorrow will be a busy day because we have someone coming on Sunday to view the house and it is in a real mess. Having packed most of my fabric, dyes, paints etc ready for the move that never happened, I then partly unpacked because I needed to use some of it! Now stuff is littering the spare room and almost every surface has clutter on it and as we know, clutter doesn't sell houses!
Lasagne for tea tonight, so I'm off to get going on it before I start picking and ruin my diet!
Friday, 10 February 2012
Monday, 6 February 2012
Another good day out
Off to Clifford on last Saturday for a meeting of our Contemporary Quilt Group. The Community Centre at Clifford is an excellent venue with plenty of tables, chairs etc, a very well equipped kitchen and very good natural light. A number of people couldn't attend, but there was a goodly number present even though it was a very cold day.
The meeting was not entirely successful. Not everyone wanted to join in with the design exercise but we did, I think more out of not wanting to say we didn't want to do it than anything else. I didn't end up with anything to show for it. Indeed, it made me think about whether such exercises are necessary. In fact I now think that they are probably not for me. My view has been reinforced by the excellent Quilt University class I am doing. This class called "Goodbye to the grid" is based on a technique that I hadn't tried before and I'm finding it very rewarding.
The afternoon session at the meeting was a demonstration of mono printing followed by everyone having a go and although this was more enjoyable and I came away with some prints, I have to confess to being rather at a loss to know what to do with them.
So I have finally reached the conclusion, and not before time, that any actual design exercise or textile technique is only valuable for me if it is done in the context of the work I'm doing at the time. So my Quilt University class will I hope provide me with a design for a quilt for the CQ at 10 challenge. If I manage to produce a finished quilt, I may even enter it in the competition, but I'm still not convinced that I want to do that.
So here are a few of the embryonic drawings that might become something!
Watch this space!
Friday, 27 January 2012
More excitement
So my little quilt has been sent off to the Contemporary Quilt Group and I hope it will be included in the exhibit that is going off to the Quilt Museum and Gallery called "Celebrating Diversity". The European Quilt Association invited member countries to submit work celebrating the diverse lives and cultures of quilters across Europe. As we British are very fond of gardening, I chose a photo of my DH and me taken on our allotment dressed for the occasion and with tools in hand!
I'm not sure it will be good enough to include in the exhibit, but I was quite pleased with it. The photo isn't very clear, but the light was bad and I was rushing to get it sent off. Finger's crossed that it will impress. At least I got the size exactly right!!!
A steep learning curve involved here concerning printing on fabric through my computer printer. I now have an Epson SX425W because the ink used is more suited for printing on fabric than the ink used in my old Hewlett Packard. However, the way the paper/ fabric goes through the printer is not so good and is very liable to jams. I tried transfer paper, but this would not go through the printer at all. I tried sticking the fabric onto ordinary paper with pritstick, and then magic tape! No this failed too. Finally, I cut a sheet of freezer paper to A4 size and ironed the fabric onto it. Trimmed the fabric carefully so that there were no odd threads or bits sticking out and bingo. It worked! Well, it worked three out of four times, but that was enough!
The edging was done with rat-tail cord zig zagged on to the very edge and that seemed to work very well. We were working to a very precise size and I thought that adding a border would make it more difficult to get this exact.
Next up is my online class with the Quilt University. I've signed up for a class called "Goodbye to the Grid" with Dena Crain. It's also our local Contemporary quilter's Group meeting tomorrow and we're doing monoprinting, and on Sunday we're having a family Sunday lunch. We have received a request that we give the steamed pudding a miss this time!! No problem!
Off to put the hoover round now! Must at least show willing!
Tuesday, 24 January 2012
New year new challenges
So, Christmas is over. We have finished eating the chocolate, watched the DVDs and read most of the books! Now what?
A link on a blog introduced me to Craftsy and they run lots of interesting online classes so I decided to sign up to the Block of the Month class which is free and also for the Sumptious Stitches class which isn't. I'm not a great fan of all the chatter on the site, but at least it got me started. Then the Contemporary Quilt magazine arrived with details of the Journal Quilt Chllenge for 2012.
The challenge this year is based on colour. The first four quilts must be mainly red and it's shades and tints, although we are allowed to include up to 25% of other colours. The lack of much definition in the rules really inspired me to get going and ideas started coming thick and fast. I decided to use the course materials from the Sumptious Stitches class for the first quilt which was inspired by the strata in the rocks at Bude.
Here is the result;
It's not as pink as it looks here, but I am quite pleased with the result. Here are some close ups of the stitching.
This has been just the thing to get my creative juices flowing and at last I feel I am starting to produce work that is worth showing off!
Next thing on the agenda is the quilt for the CQ10 challenge, more of which later!
Tuesday, 13 December 2011
Back to basics... again!
Here at textile towers the mood is relaxed now that the party frock has been done, the dressing gown delivered and presents and cards ready to be written/ wrapped. So, I decided, rather late in the day, to have a go at the Chirstmas challenge at my local quilting group.
The brief was to make an item using at least three fabrics that were striped. Earlier in the year, we had a very interesting talk on the subject of incorporating striped fabrics into our work, but as I am not an accomplished patchworker, and don't consider using striped fabric anyway, I didn't pay much attention.
Of late, I have found that my lack of expertise in the patchwork department is something I would like to address, so nothing daunted and with very little time, I decided to have a go. A friend recommended a super book which could have been designed for reluctant patchworkers like me, called Thinking Outside the Block written by Sandi Cummings. I have been trying to find time to make a start for a while, and now seemed to be as good a time as any,.
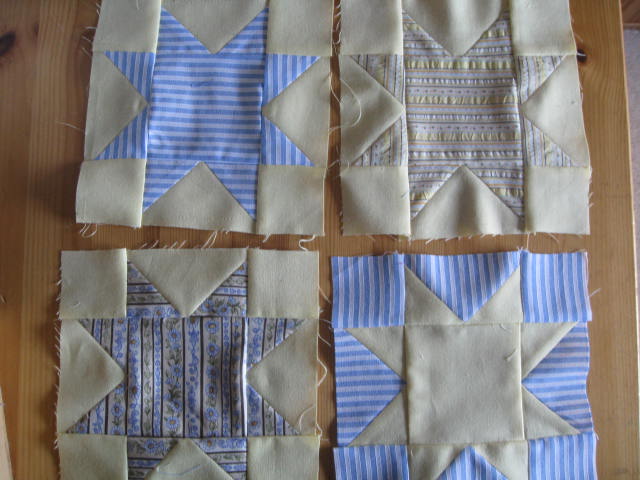
So here are the first few blocks.
Yes, I used three different striped fabrics, but I'm not sure about the result. Next up is to make some of the blocks using thin strips, appliqued spirals and the like and no doubt, there will be a finished quilt in the fullness of time! Sadly not in time for the challenge, but we enjoyed our meeting today and Margaret won the prize.
A rare group photo requested by Chris who sadly is leaving us and moving to pastures new. Although I am also planning to move away, I know I will miss the friendships I have made among these kind and generous people.
Still for now, it's back to the wrapping paper!
Friday, 9 December 2011
Sewing frenzy
I am in the middle of a sewing frenzy and loving my new sewing machine. Having made the school trousers for the GDD I was commissioned to make a party dress! My DD and her family have been invited to a Christmas party at Braham park and so a new party dress is compulsory!
Not a very good photo, but she was pleased with the result and once she gets some sparkly shoes and has her hair done, I'm sure she'll look lovely.
Now all I have to do is finish the surpise gilet for the DH, the dressing gown for madame and a post card for a friend who's moving! So this weekend will be a busy one, and next week there's a lot on so it will be good to get down to Cornwall for Christmas and get some time to relax.
It's a good job the weather is so awful so we can't get out into the garden and I don't need to feel guilty about it. I hope all the poor souls who were without power yesterday will soon be reconnected.
Back to the grindstone!
Wednesday, 16 November 2011
Free machine quilting workshop
I attended a workshop today run by Hazel Williams which was all about free machine quilting. Now I have been a keen free machine embroiderer for ages and so I had assumed that I should be able to master free machine quilting without any trouble. Sadly, my attempts to date had convinced me that is not the case. Although, embroidery using the machine is useful in that you know what your machine is capable of, free machine quilting is an entirely different technique.
We started the day talking about threads. Hazel uses thin cotton bobbin thread and favours Egyptian cotton quilting thread in the needle. The King Tut Threads are very smooth, and there is a world of difference between these and many other brands. The thread I was using was not a cheap brand, but it certainly didn't produce the same results. Hazel also uses a smaller needle that I would have chosen, a Schmetz 75(11) quilting needle rather than the 90(14) I would normally use. Once again, I didn't experience any problems.
Hazel had us drawing the designs on paper and then she demonstrated how she sewed them before we went back to our machines and had a go ourselves. We were all a bit worried about "drawing" but as the day wore on everyone got more and more confident and the patterns got more and more complicated.
So the secret is to relax, remember to breathe, don't press down too hard on the fabric and stop frequently to check where you need to go next. Oh, and don't run the machine too fast. This is all very well on small samples, and the real test will come when I try it on a bigger piece. I will give it a go though!
Here's a taster
and this link will take you to all my little samples. As you will see the stitch length is not at all even, and unfortunately I wasn't able to get the tension right on my machine. That will teach me to fiddle about with the bobbin tension screw! Lesson, if you're going to fiddle with that, always have a spare bobbin case set up to the manufacturers spec and make sure you keep it safe!
Or you could do what I did and buy a new machine! My new Bernina 380 arrives tomorrow and my dear old 135 will be going to a new home!
Perhaps I may turn out to be a quilter after all!
Subscribe to:
Posts (Atom)