Since we picked up the keys to our new home at the end of January, we have been spending our time doing exciting things like wallpaper stripping, carpet lifting, etc. Our builder wasn't able to make an immediate start so this gave us some time to clear the way for him.
Once we had finished destroying the inside, we set about attacking the garden. Next to the house, where my cabin is going to be was what can only be described as an overgrown thicket. It had once contained some shrubs, but now all appeared to be dead or dying and covered in brambles and ivy, both of which were thriving nicely. So we set about chopping it all down, with a view to having a girt (Cornish) big bonfire. Sadly, although most of it was dry, it refused to burn and despite the DH giving some encouragement by way of a slug of petrol from the lawn mower, it just sat there exuding smoke. So we decided on plan B and fourteen trips to the tip later, the pile of rubbish has now gone.
In the midst of all this I had time to make these;
The first two blocks of a new block of the month challenge from here. The Skill Builder Block of the month looks to have some fairly simple blocks, but with a modern approach. So I'm hopeful that I will find the time to carry on with it as I do find this type of thing enjoyable and relaxing.
Once again "art" will have to take a back seat as today we made a start on the front garden clearing a space for the LPG tank. More brambles, ivy and weeds to get out and the DH and I are covered in scratches. Still, we have found three hydrangea bushes that were hidden in the undergrowth that look as if they are worth saving. Now we're thinking of getting a shredder to save all those trips to the tip.
Sunday, 24 February 2013
Wednesday, 13 February 2013
The meaning of "scant"!
Not being a patch worker, who am I kidding, the concept of the 1/4 inch seam was new to me. So. Most of my early work featured dress maker's seams with the resulting bulky outcome! Now I have been educated, I know that for patchwork the scant 1/4 inch seam is the aim, but what does scant mean! Surely a 1/4 inch is just that or it should be.
So I have measured and sewn 1/4 inch seams but just can't get that precision I crave. Does it matter if the points don't meet or the block ends up at 121/4 instead of 121/2. Not really, except,if you get a bee in your bonnet about it, as I undoubtedly have, well, yes it does!
I have measured the space on my needle plate between the needle and the edge of the seam, marked it with masking tape, sticky notes and anything else that makes a line. I've used a patchwork foot, with and without a guide. In every case, the seams appear to measure exactly 1/4 inch, but the blocks don't end up the right size.
So rapidly running out of patience, I do a google search. There are videos on u-tube, blogs, all sorts of information, but none seemed to be of any real use. Then I found this
The perfect piecing seam guide! Bingo! The ruler fits on the needle plate and you position it so that the needle goes down through the little hole. Then you put the presser foot down so it can't move and put tape or sticky notes along the edge!
Now measure the seam using the guide and it is not quite 1/4 inch. So there you have it. I would like to think that I can now make blocks that turn out the size they should be, but already I'm beginning to lose interest and turn to art once more when it really doesn't matter how you put things together!
But by way of displacement activity and before embarking on the art , I made these.
Not perfect, but an improvement. The way the fabrics are placed makes it look as if the lighter fabric is placed over the darker to create a transparent effect.
At last I'm beginning to understand the concept of "The Modern Quilt". So much so that I've signed up for the Skill Builder Block of the Month so I'm going to be busy. I've completed the first two blocks and although the seams are a bit variable, I think I may have cracked the 1/4 inch problem at last.
Art is taking a back seat at the moment in favour of wallpaper stripping and undergrowth clearance at our lovely new home.
We won't be moving in for a while, but until we do, we can always look at this which is only minutes away!
Aah!
So I have measured and sewn 1/4 inch seams but just can't get that precision I crave. Does it matter if the points don't meet or the block ends up at 121/4 instead of 121/2. Not really, except,if you get a bee in your bonnet about it, as I undoubtedly have, well, yes it does!
I have measured the space on my needle plate between the needle and the edge of the seam, marked it with masking tape, sticky notes and anything else that makes a line. I've used a patchwork foot, with and without a guide. In every case, the seams appear to measure exactly 1/4 inch, but the blocks don't end up the right size.
So rapidly running out of patience, I do a google search. There are videos on u-tube, blogs, all sorts of information, but none seemed to be of any real use. Then I found this
The perfect piecing seam guide! Bingo! The ruler fits on the needle plate and you position it so that the needle goes down through the little hole. Then you put the presser foot down so it can't move and put tape or sticky notes along the edge!
Now measure the seam using the guide and it is not quite 1/4 inch. So there you have it. I would like to think that I can now make blocks that turn out the size they should be, but already I'm beginning to lose interest and turn to art once more when it really doesn't matter how you put things together!
But by way of displacement activity and before embarking on the art , I made these.
Not perfect, but an improvement. The way the fabrics are placed makes it look as if the lighter fabric is placed over the darker to create a transparent effect.
At last I'm beginning to understand the concept of "The Modern Quilt". So much so that I've signed up for the Skill Builder Block of the Month so I'm going to be busy. I've completed the first two blocks and although the seams are a bit variable, I think I may have cracked the 1/4 inch problem at last.
Art is taking a back seat at the moment in favour of wallpaper stripping and undergrowth clearance at our lovely new home.
We won't be moving in for a while, but until we do, we can always look at this which is only minutes away!
Aah!
Thursday, 3 January 2013
If only..
it had happened sooner, we could have been getting our new garden cleared by now! Oh well, these things just take longer than you think, but at least we can go and look at our potential new home from time to time.
So as it was sunny on New year's day we went over to Mullion and walked to Gunwalloe over the cliff path. This is the view looking back towards Poldhu cove. If someone had told me last year that this is where we were going to be living, I would have laughed and said, don't be silly!! But this is within half a mile of our new home and a view that we will be drinking in most days and probably in most weathers!!
This is the view towards Porthleven from the cliff path and below is one of the drier less muddy bits of the path!!
Remember the Hippo song? Well, glorious mud it certainly was, but fortunately we didn't have to wallow in it!
On the indoor front, my new sewing machine arrived and has been tried and found fabulous! Also my Horn sewing table came just before Christmas and the very helpful delivery man put it all together and it's very useful.
Happy new year!
So as it was sunny on New year's day we went over to Mullion and walked to Gunwalloe over the cliff path. This is the view looking back towards Poldhu cove. If someone had told me last year that this is where we were going to be living, I would have laughed and said, don't be silly!! But this is within half a mile of our new home and a view that we will be drinking in most days and probably in most weathers!!
This is the view towards Porthleven from the cliff path and below is one of the drier less muddy bits of the path!!
Remember the Hippo song? Well, glorious mud it certainly was, but fortunately we didn't have to wallow in it!
On the indoor front, my new sewing machine arrived and has been tried and found fabulous! Also my Horn sewing table came just before Christmas and the very helpful delivery man put it all together and it's very useful.
Last but not least, here's a taste of spring in December!
Friday, 30 November 2012
Textile Maids
Today I went to the inaugural meeting of a proposed new textile art group which is to be called Textile maids and we met in the cafe at Heartlands. This is a new feature built on and around an old mining site and is part of the Cornish Mining Heritage Development and it is hoped will attract lots of visitors into an area not noted for tourist attractions. Carolyn and Sue who run Beyond Patchwork came up with the idea and after a bit of to-ing and fro-ing it seems that the group is going to go ahead.
There will be a monthly meeting and each month there will be a group challenge and the aim is that eventually, we will have enough work to hold our own exhibitions. It was a very lively meeting and everyone seemed to be very keen, especially when Carolyn stressed that the main idea behind the group was to have fun! Well, no arguing with that!
Our first theme is Heartlands itself, and although it is rather bleak, there are a lot of things there to inspire.
Railway tracks in the yard.
Water running in a leat.
Old machinery.
And there has to be a plaque!
More machinery and some interesting shapes.
Some lovely rust on a pillar.
An old tin stamp.
Marks on the walls.
More machinery.
and finally, some stones in the chimney.
So, I think I may have a go at producing something that will reflect both the bleakness and the hope that the site aims to generate . With all the other things that are on, it may be a bit of a tall order, but we'll see! I think this may just be a impetus I need to get me going again on producing some arty pieces rather than worrying about patchwork!
Having said that though, I have to say that it is a comfort and my new machine is helping me get those points matching!
This quilt which was on show at Cowslips when we visited on Tuesday is so lovely and I so fell in love with the quilting, that I must have a go!
Trying to work out the pattern has proved to be a bit of a challenge so I'm giving it my own take!
Now I'm off to sit in our newly heated sitting room and listen to our central heating boiler doing it's thing now that the oil has been delivered. Note to self and DH check the oil level more often so you don't let it run out!!!!
Monday, 26 November 2012
Branching out ...again
Since arriving here in Cornwall I have discovered that there are lots and lots of quilting and patchwork groups, but very few have websites and they don't tend to publicise themselves. Occasionally there will be an advert in a local paper, or on a lamp post or shop window about such and such a group holding an exhibition in a village hall, but trying to find out about groups near me, and then finding out if I could join has not been easy. What has struck me is how little interest there is in the Quilter's Guild down here and sad to say it seems that the Guild itself doesn't really seem all that interested in us. However, a friend recommended South West Quilters and on Saturday they held a meeting nearby so I went along.
It was a very lively meeting and I thoroughly enjoyed it. So much so, that I decided to join. It's cheaper than the QGBI, they also produce a nice magazine and they hold regular workshops at a very modest cost. So, I sent off my cheque and today I received my new member's pack and membership card.
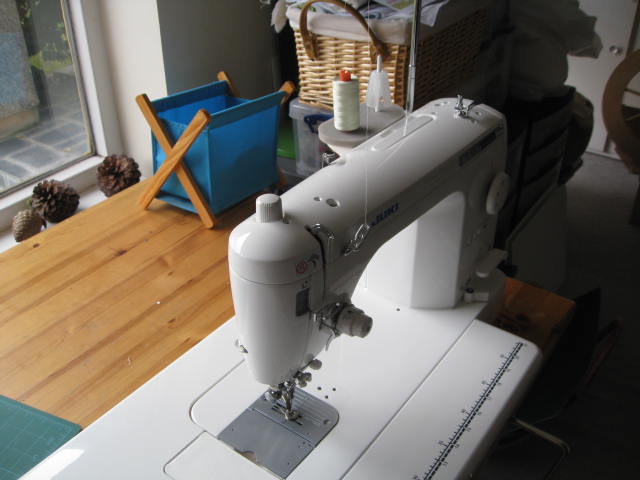
After all the terrible rain and wind we have had here, there isn't much chance of long cliff walks, so a nice quilting project will fit the bill nicely. To that end, I've used my legacy from my DH's Aunt to buy a new toy and here it is!
It is a Juki TL98P. No fancy stitches, not even a zig zag stitch, but it is fabulous for free machine quilting and it's really robust. Not suitable for taking to workshops, but I'll soon have my new Horn quilting cabinet for it to sit in and away I go!!!
Tomorrow I'm off on a trip around various quilting shops with the Trevithick Quilters, floods permitting to stock up with essentials! I anticipate that fabric will find it's way into my shopping bag, but I must try and be careful not to get overloaded. I think the stash is beginning to resemble a small mountain and there's real doubt that I will ever be able to use it all!
It was a very lively meeting and I thoroughly enjoyed it. So much so, that I decided to join. It's cheaper than the QGBI, they also produce a nice magazine and they hold regular workshops at a very modest cost. So, I sent off my cheque and today I received my new member's pack and membership card.
After all the terrible rain and wind we have had here, there isn't much chance of long cliff walks, so a nice quilting project will fit the bill nicely. To that end, I've used my legacy from my DH's Aunt to buy a new toy and here it is!
It is a Juki TL98P. No fancy stitches, not even a zig zag stitch, but it is fabulous for free machine quilting and it's really robust. Not suitable for taking to workshops, but I'll soon have my new Horn quilting cabinet for it to sit in and away I go!!!
Tomorrow I'm off on a trip around various quilting shops with the Trevithick Quilters, floods permitting to stock up with essentials! I anticipate that fabric will find it's way into my shopping bag, but I must try and be careful not to get overloaded. I think the stash is beginning to resemble a small mountain and there's real doubt that I will ever be able to use it all!
Friday, 23 November 2012
More to the point!
Last year I signed up for a Craftsy class with Kimberly Einmo called Magical Jelly Roll quilts. This class is all about using jelly rolls, charm packs and layer cakes to make some traditional blocks but with a more contemporary look. I'm not really interested in patchwork for it's own sake, but this class looked as if it might be useful to me in my quilting journey.
I have a number of jelly rolls, charm packs and layer cakes in my stash, all of which I bought with an idea in mind that didn't in the end come to anything. So I started in on the flying geese tutorial where Kimberly shows how to make flying geese in a way that doesn't waste any fabric and combine them with squares and triangles to make a very pretty quilt pattern.
Sometimes I do wonder about people who sit at their sewing machine and turn out perfect squares and triangles that lie flat and where all the points meet exactly. Can it be that difficult? Well, it might look easy, but it isn't and some, including me, would say, so what? But you know, there's something about the exercise of joining two pieces of fabric together and actually getting the resulting shape to behave just as you want it to, and for me recently it's become a bit of an obsession! Some would say, and who could blame them, to the point of becoming a nerd!!!!
So Kimberly's flying geese turn out to be perfect rectangles which need no trimming and are all the same size! My flying geese have wonky edges and are not at all the same size. So I practice and again and again I come up against the same problem. Kimberly advises using spray starch to stabilise the fabric so I try that with mixed results. Oh, I'm fed up so I'll move on to the next class!
Onto the Lonestar Strip magic! Once again, I followed the instructions and made a bit of a pigs ear, but I thought with practice again, I could do better. So I tried one of my new jelly rolls and found that no matter how I tried, it just wouldn't go together as it should.
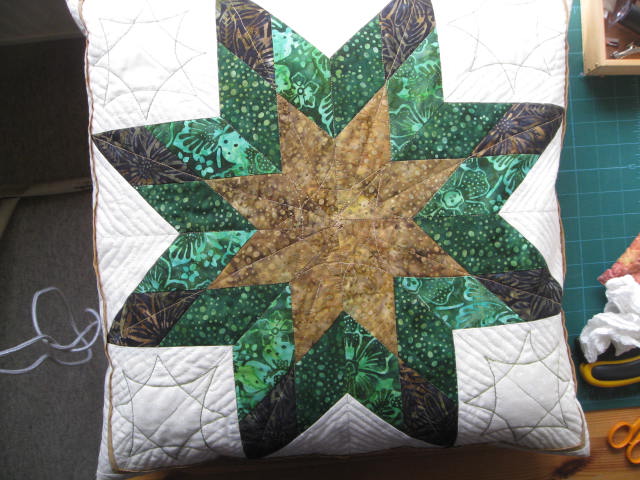
I persevered, and after putting on a fake piping strip to conceal the fact that the points of the star disappeared in the border and some quilting; here it is made up into a cushion cover;
After a lot of head scratching, I finally got my ruler out and measured the strips and you know what? They're not 21/2 inches wide like it says on the packet, they actually measure 23/4 inches wide! Doesn't sound like much, but it explains a lot.
So, now I'm trying again having shaved 1/4 inch off each strip, measuring my scant 1/4 inch seam with a ruler before, during and after sewing, pressing not ironing etc. Will it make a difference?
Know what, yes it did! After being so careful with the measuring, cutting and sewing, I have a beautiful star. All the points meet, well almost; the middle is in the middle and,,,, wait for it..... the points at the edge are all 1/4" in from the edge, so haven't been cut off when I sewed on the border!
So here it is. Not yet quilted, but very satisfying to have done it!
Now having got that out of my system, I'm going back to "art"!
I have a number of jelly rolls, charm packs and layer cakes in my stash, all of which I bought with an idea in mind that didn't in the end come to anything. So I started in on the flying geese tutorial where Kimberly shows how to make flying geese in a way that doesn't waste any fabric and combine them with squares and triangles to make a very pretty quilt pattern.
Sometimes I do wonder about people who sit at their sewing machine and turn out perfect squares and triangles that lie flat and where all the points meet exactly. Can it be that difficult? Well, it might look easy, but it isn't and some, including me, would say, so what? But you know, there's something about the exercise of joining two pieces of fabric together and actually getting the resulting shape to behave just as you want it to, and for me recently it's become a bit of an obsession! Some would say, and who could blame them, to the point of becoming a nerd!!!!
So Kimberly's flying geese turn out to be perfect rectangles which need no trimming and are all the same size! My flying geese have wonky edges and are not at all the same size. So I practice and again and again I come up against the same problem. Kimberly advises using spray starch to stabilise the fabric so I try that with mixed results. Oh, I'm fed up so I'll move on to the next class!
Onto the Lonestar Strip magic! Once again, I followed the instructions and made a bit of a pigs ear, but I thought with practice again, I could do better. So I tried one of my new jelly rolls and found that no matter how I tried, it just wouldn't go together as it should.
I persevered, and after putting on a fake piping strip to conceal the fact that the points of the star disappeared in the border and some quilting; here it is made up into a cushion cover;
After a lot of head scratching, I finally got my ruler out and measured the strips and you know what? They're not 21/2 inches wide like it says on the packet, they actually measure 23/4 inches wide! Doesn't sound like much, but it explains a lot.
So, now I'm trying again having shaved 1/4 inch off each strip, measuring my scant 1/4 inch seam with a ruler before, during and after sewing, pressing not ironing etc. Will it make a difference?
Know what, yes it did! After being so careful with the measuring, cutting and sewing, I have a beautiful star. All the points meet, well almost; the middle is in the middle and,,,, wait for it..... the points at the edge are all 1/4" in from the edge, so haven't been cut off when I sewed on the border!
So here it is. Not yet quilted, but very satisfying to have done it!
Now having got that out of my system, I'm going back to "art"!
Tuesday, 13 November 2012
Friendship
Sometimes I wonder about what friendship means. Many times we think of people we know as if they were friends, but then it turns out that they may have been nothing more than acquaintances who happen to have a common interest. I did wonder how many of the people I regarded as friends would keep in touch with me after I had moved and only a few have kept in touch. So, even though I had known some of them a long time, and saw them on a regular basis, it seems that they did not regard me as a friend, merely an acquaintance with a common interest.
Now we have emails, facebook, ipads etc, it's very easy to keep in touch at a distance and so I have been trying not to mind very much about the ones who haven't. Some have kept in touch and I really value them, but things move on, and I am slowly getting used to my new surroundings and have started making friends here. Of course, it goes without saying that my best friend and constant companion, my DH is as dear to me as ever.
So, off to Trevithick Quilters today and had a lovely time chatting and getting on with some Christmas projects for my nearest and dearest. These ladies have really welcomed me and I hope that in time some of them will become true friends. They are a very lively bunch and their programme for the coming year is packed full of activities, group quilts, trips and workshops. Today I met two ladies who I hadn't met before and they were both engaged in some truly lovely hand embroidery which I really must try.
So, as I felt a bit isolated just after the move, I decided to join in with a "Friendship Quilt Swap" organised by the Quilters Gallery . I signed up to register my blog with them a while ago and they always have lots of interesting things to look at. The aim of the swap was to make a small quilt incorporating some hand embroidery to a design downloaded for free, from The Stitching Cow.
Here's my little quilt ready to be posted to my swap partner who lives in Virginia USA.
Now we have emails, facebook, ipads etc, it's very easy to keep in touch at a distance and so I have been trying not to mind very much about the ones who haven't. Some have kept in touch and I really value them, but things move on, and I am slowly getting used to my new surroundings and have started making friends here. Of course, it goes without saying that my best friend and constant companion, my DH is as dear to me as ever.
So, off to Trevithick Quilters today and had a lovely time chatting and getting on with some Christmas projects for my nearest and dearest. These ladies have really welcomed me and I hope that in time some of them will become true friends. They are a very lively bunch and their programme for the coming year is packed full of activities, group quilts, trips and workshops. Today I met two ladies who I hadn't met before and they were both engaged in some truly lovely hand embroidery which I really must try.
So, as I felt a bit isolated just after the move, I decided to join in with a "Friendship Quilt Swap" organised by the Quilters Gallery . I signed up to register my blog with them a while ago and they always have lots of interesting things to look at. The aim of the swap was to make a small quilt incorporating some hand embroidery to a design downloaded for free, from The Stitching Cow.
Here's my little quilt ready to be posted to my swap partner who lives in Virginia USA.
A rather twee message, it's true, but not too challenging to sew!
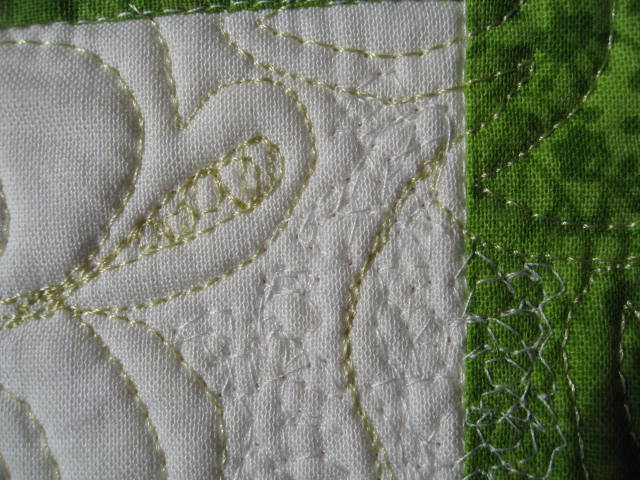
I did go a bit overboard on the quilting, but in the end I was really pleased with the result.
So, on the 24th September, I posted my quilt off and chose to send it by air mail, sent an email to my swap partner and the coordinator to tell them it was on it's way and waited. A long silence followed and so last week I emailed the coordinator to say that despite two emails to my swap partner, I had had no reply and still didn't know if my little quilt had arrived safely. My swap partner is not the person who is sending me a quilt, and I haven't received one yet so pardon me for feeling that this had been a waste of time and that the hands of friendship do not extend very far!!!
Then today, my swap partner, Patricia sent me an email to say that my quilt had arrived safely, but it took 42 days to get there rather than the 7 to 10 days I had been given to believe! Also, the reason she had not replied before was that she had had a really bad fall and had suffered some horrible injuries and had not been able to do anything much until now. In fact she had decided that as she had not been able to make a quilt herself to pass on to her swap partner, she was going to send mine on to them and not keep it, even though she said she really loved it.
So I'm rethinking my definition of what friendship means and even though I probably won't ever get to meet Patricia, I feel she is a friend in the true sense and I'm glad I took part in the swap now.
Subscribe to:
Posts (Atom)